I’ll be honest—before I went vegan, I thought quiche was completely off the table. Like, how do you make a custardy egg dish without the eggs? Turns out, tofu does the job really well. You just blend it up with some nutritional yeast and spices, and somehow it works.
The trick is using the right kind of tofu. You need extra-firm, and you need to press it first to get the water out. If you skip that step, your quiche will be watery and sad. But when you do it right, the filling sets up just like the real thing. Plus, loading it with asparagus and peas makes it feel fancy without much effort.
Why You’ll Love This Vegan Quiche
- Plant-based and dairy-free – This vegan quiche delivers all the creamy, savory goodness of traditional quiche without any eggs or dairy, making it perfect for anyone following a plant-based diet.
- Gluten-free option available – You can easily make this with the gluten-free flour mix, so everyone at your table can enjoy a slice regardless of dietary restrictions.
- Fresh spring flavors – The combination of asparagus, basil, and lemon gives this quiche a bright, seasonal taste that feels light and satisfying at the same time.
- Great for meal prep – This quiche keeps well in the fridge and tastes delicious cold or reheated, making it an easy option for breakfast, lunch, or dinner throughout the week.
- Impressive presentation – Whether you’re hosting brunch or bringing a dish to a potluck, this beautiful quiche looks like you spent hours in the kitchen even though it’s straightforward to make.
What Kind of Tofu Should I Use?
For this vegan quiche, you’ll want to use firm silken tofu, which might sound a bit confusing since silken tofu is usually soft. The key here is finding the firm variety of silken tofu – it has a smooth, creamy texture that blends beautifully into a custard-like filling, but it’s sturdy enough to hold its shape when baked. Regular firm tofu won’t work as well because it’s too dense and grainy, while soft silken tofu will make your quiche too watery. You can usually find firm silken tofu in shelf-stable aseptic packages in the Asian foods section of your grocery store, and brands like Mori-Nu or Clearspring are reliable options. Make sure to drain any excess liquid from the package before using it in your recipe.
Options for Substitutions
This vegan quiche is pretty forgiving when it comes to swaps, so here are some options if you’re missing an ingredient or two:
- Firm silken tofu: This is the base of your quiche filling, so I wouldn’t substitute it. The silken texture is what gives you that creamy, custard-like consistency that makes this quiche work.
- Coconut oil: You can use vegan butter or even a neutral oil like vegetable or canola oil instead. If using liquid oil, you may need to chill your dough a bit longer before rolling.
- Gluten-free flour mix: If you don’t need this to be gluten-free, just use the all-purpose flour option instead. The recipe gives you both choices.
- Black salt (kala namak): This gives that eggy flavor, but if you don’t have it, just use regular sea salt. You’ll lose some of that traditional quiche taste, but it’ll still be good.
- Asparagus: Feel free to swap with other vegetables like broccoli, zucchini, mushrooms, or bell peppers. Just make sure to cook any watery vegetables first to avoid a soggy quiche.
- Chickpea flour: You can use cornstarch or arrowroot powder instead, but chickpea flour adds a nice binding quality and subtle flavor that works well here.
- Nutritional yeast: This adds a cheesy, savory flavor, but you can leave it out if needed. The quiche will be milder but still tasty.
Watch Out for These Mistakes While Baking
The biggest mistake when making vegan quiche is not blind-baking the crust properly, which leads to a soggy bottom – make sure to use enough pie weights and bake until the edges are lightly golden before adding the filling.
Since tofu-based fillings have more moisture than traditional egg custards, it’s important to let your quiche cool completely before slicing, as cutting it while warm will cause it to fall apart and lose its shape.
Don’t skip the chickpea flour in the filling, as it acts as a binder and helps the quiche set properly, and if your filling seems too thick when blending, add water one tablespoon at a time rather than thinning it too much.
For the best flavor, taste your filling before baking and adjust the black salt (kala namak) and lemon juice to your preference, since these ingredients give the quiche that eggy, savory taste that makes it special.
What to Serve With Vegan Quiche?
This vegan quiche makes a great centerpiece for brunch or a light dinner, and I love pairing it with a simple mixed greens salad dressed with olive oil and lemon juice to keep things fresh. Roasted potatoes or sweet potato wedges on the side add some heartiness without overwhelming the delicate asparagus and basil flavors in the quiche. If you’re serving this for a crowd, consider adding some fresh fruit like berries or melon, which provides a nice sweet contrast to the savory filling. A crusty baguette or some warm dinner rolls are also perfect for rounding out the meal.
Storage Instructions
Store: This vegan quiche keeps really well in the fridge for up to 4 days. Just cover it tightly with plastic wrap or store it in an airtight container. It’s great for meal prep since you can slice it up and grab a piece whenever you need a quick lunch or snack.
Freeze: You can freeze the whole quiche or individual slices for up to 2 months. Wrap it well in plastic wrap and then in foil to prevent freezer burn. I like to freeze individual portions so I can just grab one when I need it.
Reheat: For the best texture, reheat slices in the oven at 350°F for about 15-20 minutes until warmed through. You can also use the microwave for about 1-2 minutes, but the crust won’t be quite as crispy. If reheating from frozen, let it thaw in the fridge overnight first.
| Preparation Time | 70-90 minutes |
| Cooking Time | 75-85 minutes |
| Total Time | 145-175 minutes |
| Level of Difficulty | Hard |
| Servings | 8 slices |
Estimated Nutrition
Estimated nutrition for the whole recipe (without optional ingredients):
- Calories: 1900-2100
- Protein: 60-75 g
- Fat: 65-75 g
- Carbohydrates: 250-270 g
Ingredients
For the crust:
- 2 cups all-purpose flour (or GF blend)
- 1/2 teaspoon xanthan gum (if using GF flour)
- 1/2 teaspoon salt
- 10 tablespoons coconut oil (solidified, chilled)
- 5-7 tablespoons ice cold water
For the filling:
- 2 green onions
- 2 garlic cloves (freshly minced)
- 1 oz fresh basil
- 16 oz extra-firm tofu (pressed)
- 1 teaspoon lemon zest
- 2 tablespoons lemon juice
- 4 tablespoons nutritional yeast
- 1/2 teaspoon ground nutmeg
- 1/4 teaspoon ground turmeric (for color)
- 1 tablespoon extra virgin olive oil
- 1/2 teaspoon salt
- 1/2 teaspoon black salt (kala namak)
- 1/4 teaspoon black pepper
- 4 tablespoons chickpea flour
- 11 oz asparagus (trimmed and cut into 1-inch pieces)
- 1 cup petit pois (peas)
Step 1: Make and Chill the Pie Crust
- 2 cups all-purpose flour
- 1/2 teaspoon xanthan gum
- 1/2 teaspoon salt
- 10 tablespoons coconut oil
- 5-7 tablespoons ice cold water
Combine flour, salt, and xanthan gum (if using gluten-free flour) in a large bowl.
Cut the chilled, solidified coconut oil into small cubes and add to the flour mixture.
Using your fingertips or a pastry cutter, work the coconut oil into the flour until the mixture resembles coarse breadcrumbs—this creates pockets of fat that will make the crust flaky.
Add ice-cold water a tablespoon at a time, mixing gently until the dough just comes together without being wet or sticky.
Shape into a ball, wrap in plastic, and refrigerate for at least 30 minutes while you prepare the filling.
Step 2: Prepare the Tofu Filling Base
- 16 oz extra-firm tofu
- 2 garlic cloves
- 2 green onions
- 1 oz fresh basil
Press the extra-firm tofu between paper towels or a clean kitchen towel under a weight (like a cast iron skillet or canned goods) for 10-15 minutes to remove excess moisture—this is crucial for getting a creamy, custard-like texture rather than a watery filling.
Mince the garlic, chop the green onions (separating whites and greens), and finely chop the fresh basil.
I like to add the garlic and white parts of the green onions to a food processor with the pressed tofu first, as it creates a more integrated, unified flavor throughout the filling.
Step 3: Roll Out Crust and Prepare for Blind Baking
- dough from Step 1
Preheat your oven to 180°C (355°F).
On a lightly floured surface, roll out the chilled dough to about 1/8-inch thickness and carefully transfer it to a tart pan or 9-10 inch pie dish, pressing gently into the bottom and sides.
Trim any excess dough from the edges.
Prick the bottom several times with a fork to prevent puffing, then chill the crust for 15 minutes while you prep your filling ingredients.
This second chill ensures the crust holds its shape during blind baking.
Step 4: Blind Bake the Crust
- crust from Step 3
Line the chilled crust with parchment paper and fill with pie weights, dried beans, or rice to prevent the bottom from puffing up.
Bake at 180°C (355°F) for 15 minutes, then carefully remove the weights and parchment and bake for another 10 minutes until the crust is light golden and set but not fully cooked through.
This partial baking ensures a crispy crust that won’t become soggy from the wet filling.
Step 5: Blend the Tofu Custard Filling
- tofu and aromatics mixture from Step 2
- 1 teaspoon lemon zest
- 2 tablespoons lemon juice
- 4 tablespoons nutritional yeast
- 1/2 teaspoon ground nutmeg
- 1/4 teaspoon ground turmeric
- 1 tablespoon extra virgin olive oil
- 1/2 teaspoon salt
- 1/2 teaspoon black salt
- 1/4 teaspoon black pepper
- 4 tablespoons chickpea flour
To the food processor with your tofu and aromatics from Step 2, add the lemon zest, lemon juice, nutritional yeast, nutmeg, turmeric, extra virgin olive oil, both salts, black pepper, and basil.
Blend until completely smooth and creamy, scraping down the sides as needed—this should take 2-3 minutes.
In a separate small bowl, add the chickpea flour and blend it in as well, or add it directly to the processor.
The chickpea flour acts as a binder, helping the custard set properly during baking.
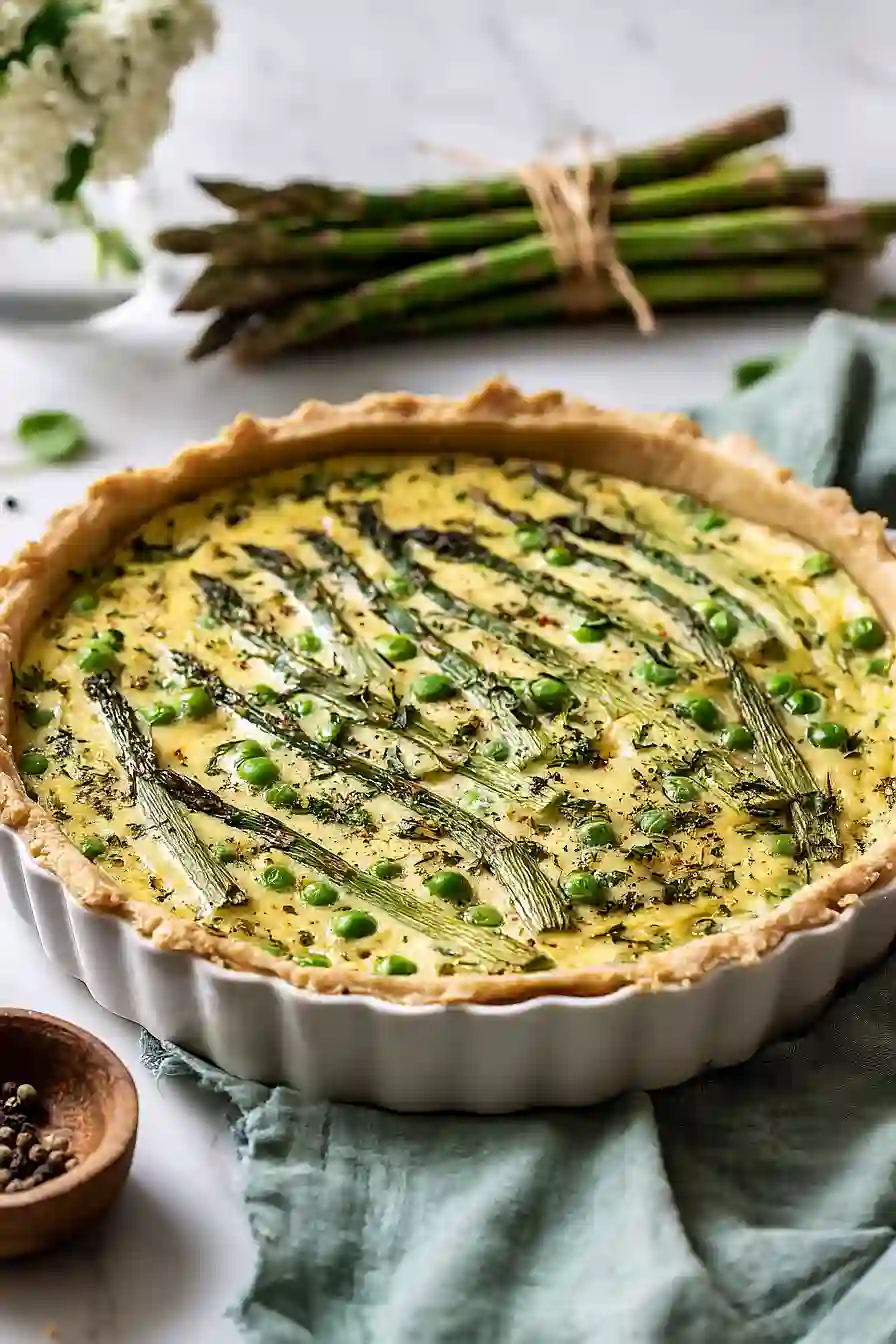
Step 6: Assemble and Bake the Quiche
- partially baked crust from Step 4
- 11 oz asparagus
- 1 cup petit pois
- tofu custard filling from Step 5
Trim the asparagus into 1-inch pieces and combine with the peas.
Spread this vegetable mixture evenly over the partially baked crust from Step 4.
Pour the smooth tofu filling from Step 5 over the vegetables, using a spatula to distribute it evenly and gently settle the vegetables into the custard.
I find letting the filling sit for a minute before pouring helps it spread more easily without displacing the vegetables.
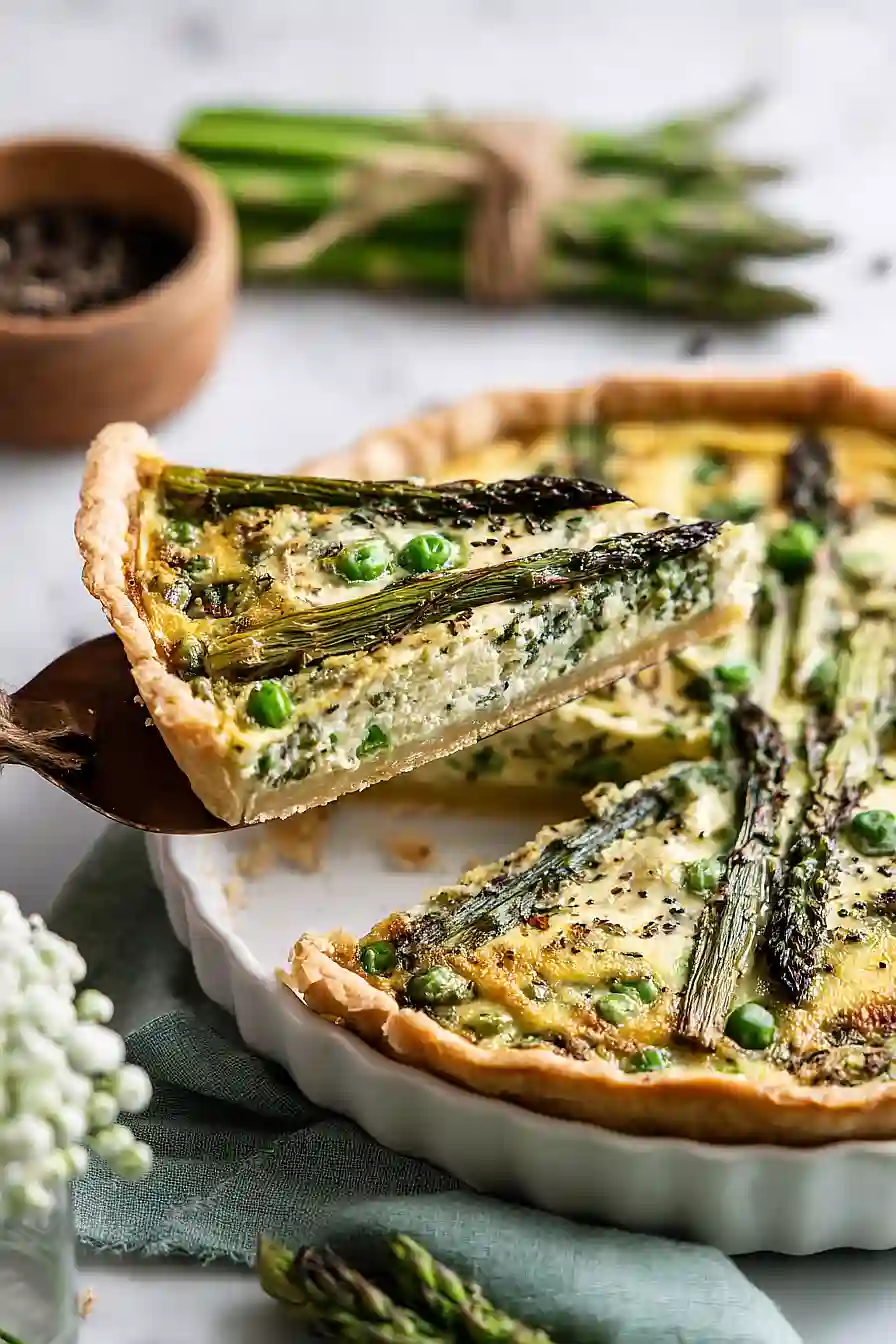
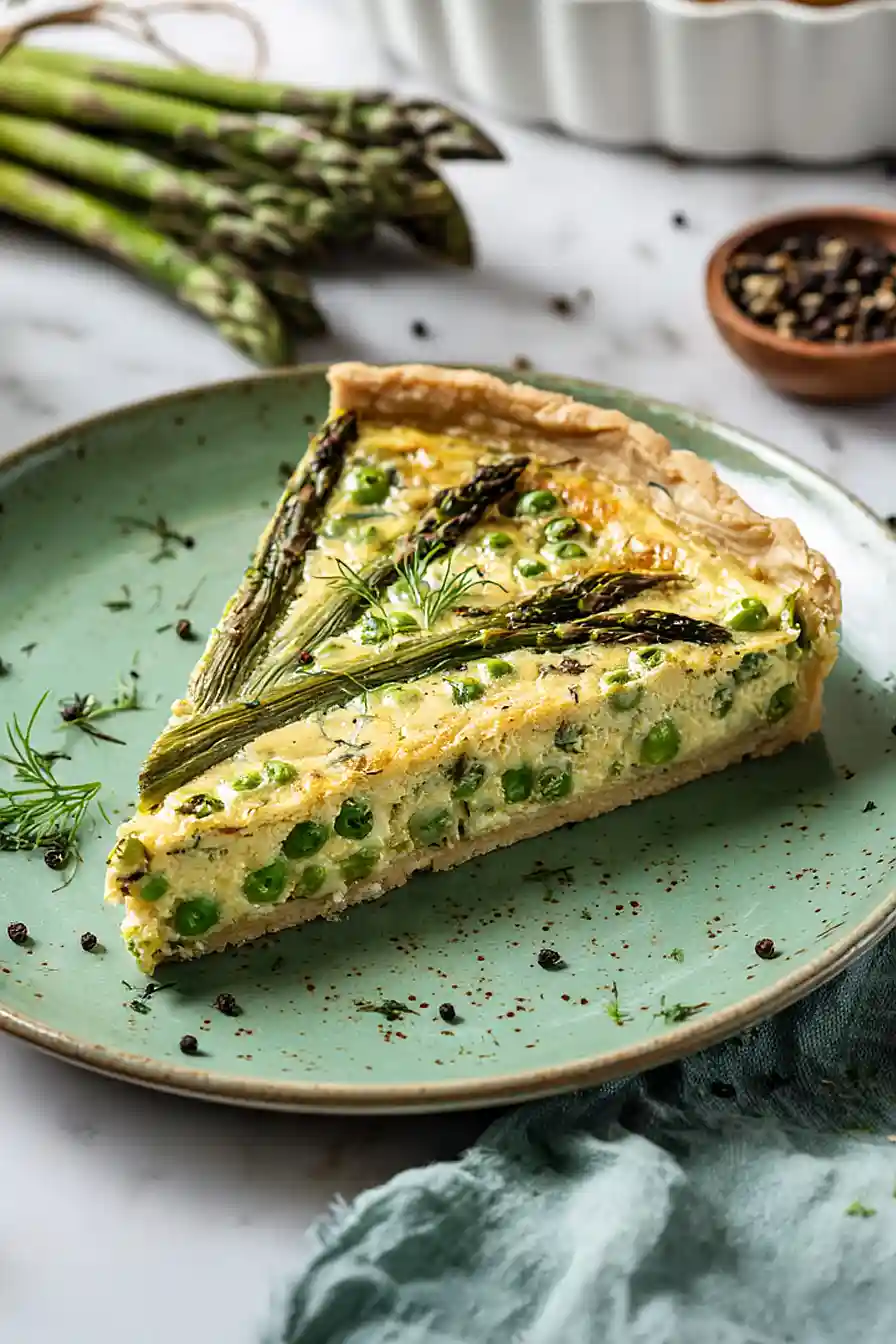
Increase the oven temperature to 200°C (390°F) and bake for 35-40 minutes until the top is golden and the filling is set but still has a slight jiggle in the center—this means it will be creamy, not rubbery.
Step 7: Cool and Serve
Remove the quiche from the oven and let it cool completely at room temperature for at least 30 minutes before slicing—this allows the filling to set fully and makes for cleaner, more beautiful slices.
The quiche can be served warm, at room temperature, or chilled, making it perfect for meal prep or entertaining.

Dairy-Free Vegan Quiche with Asparagus
Ingredients
For the crust
- 2 cups all-purpose flour (or GF blend)
- 1/2 teaspoon xanthan gum (if using GF flour)
- 1/2 teaspoon salt
- 10 tablespoons coconut oil (solidified, chilled)
- 5-7 tablespoons ice cold water
For the filling
- 2 green onions
- 2 garlic cloves (freshly minced)
- 1 oz fresh basil
- 16 oz extra-firm tofu (pressed)
- 1 teaspoon lemon zest
- 2 tablespoons lemon juice
- 4 tablespoons nutritional yeast
- 1/2 teaspoon ground nutmeg
- 1/4 teaspoon ground turmeric (for color)
- 1 tablespoon extra virgin olive oil
- 1/2 teaspoon salt
- 1/2 teaspoon black salt (kala namak)
- 1/4 teaspoon black pepper
- 4 tablespoons chickpea flour
- 11 oz asparagus (trimmed and cut into 1-inch pieces)
- 1 cup petit pois (peas)
Instructions
- Combine flour, salt, and xanthan gum (if using gluten-free flour) in a large bowl. Cut the chilled, solidified coconut oil into small cubes and add to the flour mixture. Using your fingertips or a pastry cutter, work the coconut oil into the flour until the mixture resembles coarse breadcrumbs—this creates pockets of fat that will make the crust flaky. Add ice-cold water a tablespoon at a time, mixing gently until the dough just comes together without being wet or sticky. Shape into a ball, wrap in plastic, and refrigerate for at least 30 minutes while you prepare the filling.
- Press the extra-firm tofu between paper towels or a clean kitchen towel under a weight (like a cast iron skillet or canned goods) for 10-15 minutes to remove excess moisture—this is crucial for getting a creamy, custard-like texture rather than a watery filling. Mince the garlic, chop the green onions (separating whites and greens), and finely chop the fresh basil. I like to add the garlic and white parts of the green onions to a food processor with the pressed tofu first, as it creates a more integrated, unified flavor throughout the filling.
- Preheat your oven to 180°C (355°F). On a lightly floured surface, roll out the chilled dough to about 1/8-inch thickness and carefully transfer it to a tart pan or 9-10 inch pie dish, pressing gently into the bottom and sides. Trim any excess dough from the edges. Prick the bottom several times with a fork to prevent puffing, then chill the crust for 15 minutes while you prep your filling ingredients. This second chill ensures the crust holds its shape during blind baking.
- Line the chilled crust with parchment paper and fill with pie weights, dried beans, or rice to prevent the bottom from puffing up. Bake at 180°C (355°F) for 15 minutes, then carefully remove the weights and parchment and bake for another 10 minutes until the crust is light golden and set but not fully cooked through. This partial baking ensures a crispy crust that won't become soggy from the wet filling.
- To the food processor with your tofu and aromatics from Step 2, add the lemon zest, lemon juice, nutritional yeast, nutmeg, turmeric, extra virgin olive oil, both salts, black pepper, and basil. Blend until completely smooth and creamy, scraping down the sides as needed—this should take 2-3 minutes. In a separate small bowl, add the chickpea flour and blend it in as well, or add it directly to the processor. The chickpea flour acts as a binder, helping the custard set properly during baking.
- Trim the asparagus into 1-inch pieces and combine with the peas. Spread this vegetable mixture evenly over the partially baked crust from Step 4. Pour the smooth tofu filling from Step 5 over the vegetables, using a spatula to distribute it evenly and gently settle the vegetables into the custard. I find letting the filling sit for a minute before pouring helps it spread more easily without displacing the vegetables. Increase the oven temperature to 200°C (390°F) and bake for 35-40 minutes until the top is golden and the filling is set but still has a slight jiggle in the center—this means it will be creamy, not rubbery.
- Remove the quiche from the oven and let it cool completely at room temperature for at least 30 minutes before slicing—this allows the filling to set fully and makes for cleaner, more beautiful slices. The quiche can be served warm, at room temperature, or chilled, making it perfect for meal prep or entertaining.