If you ask me, millionaire cake is pure genius in dessert form.
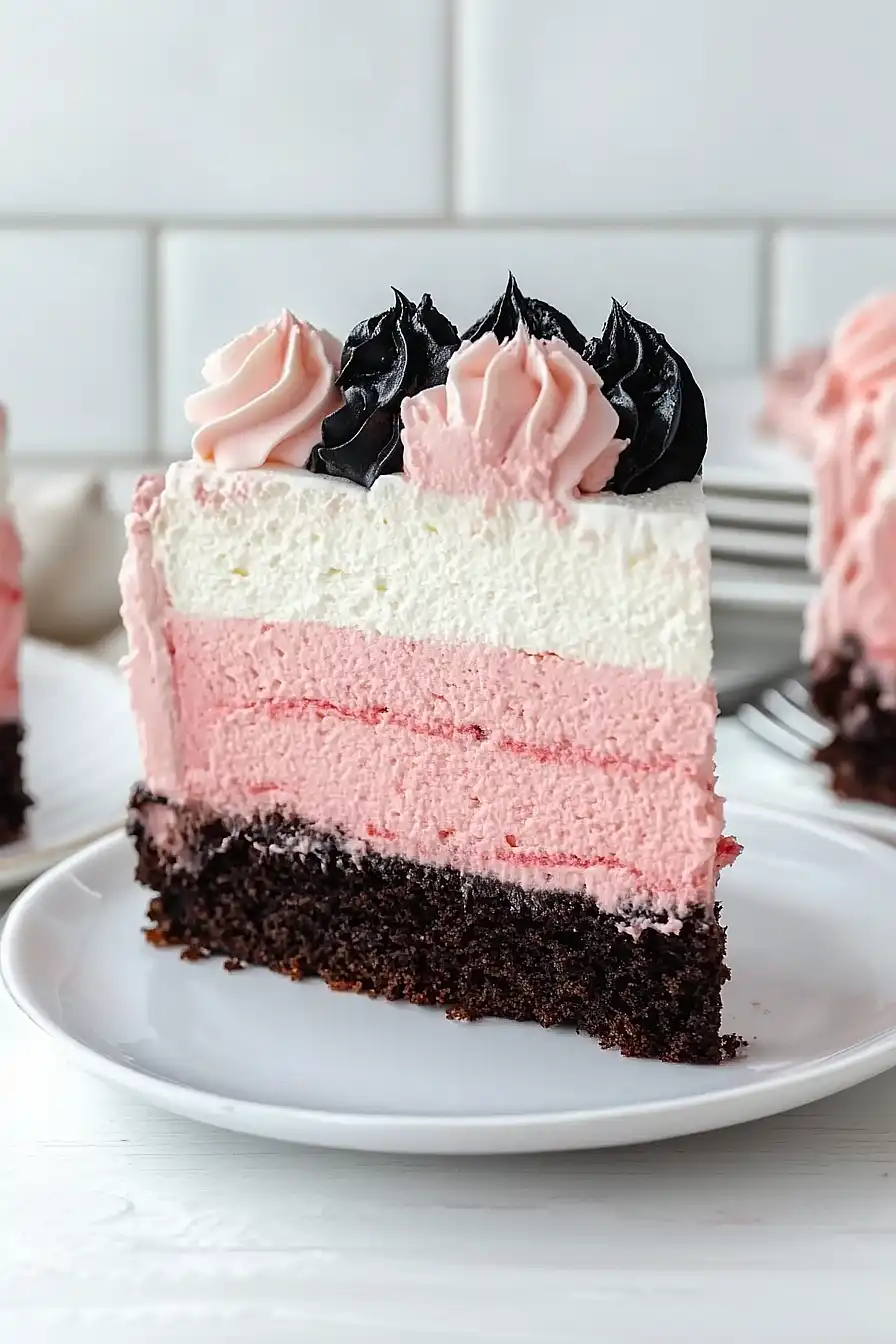
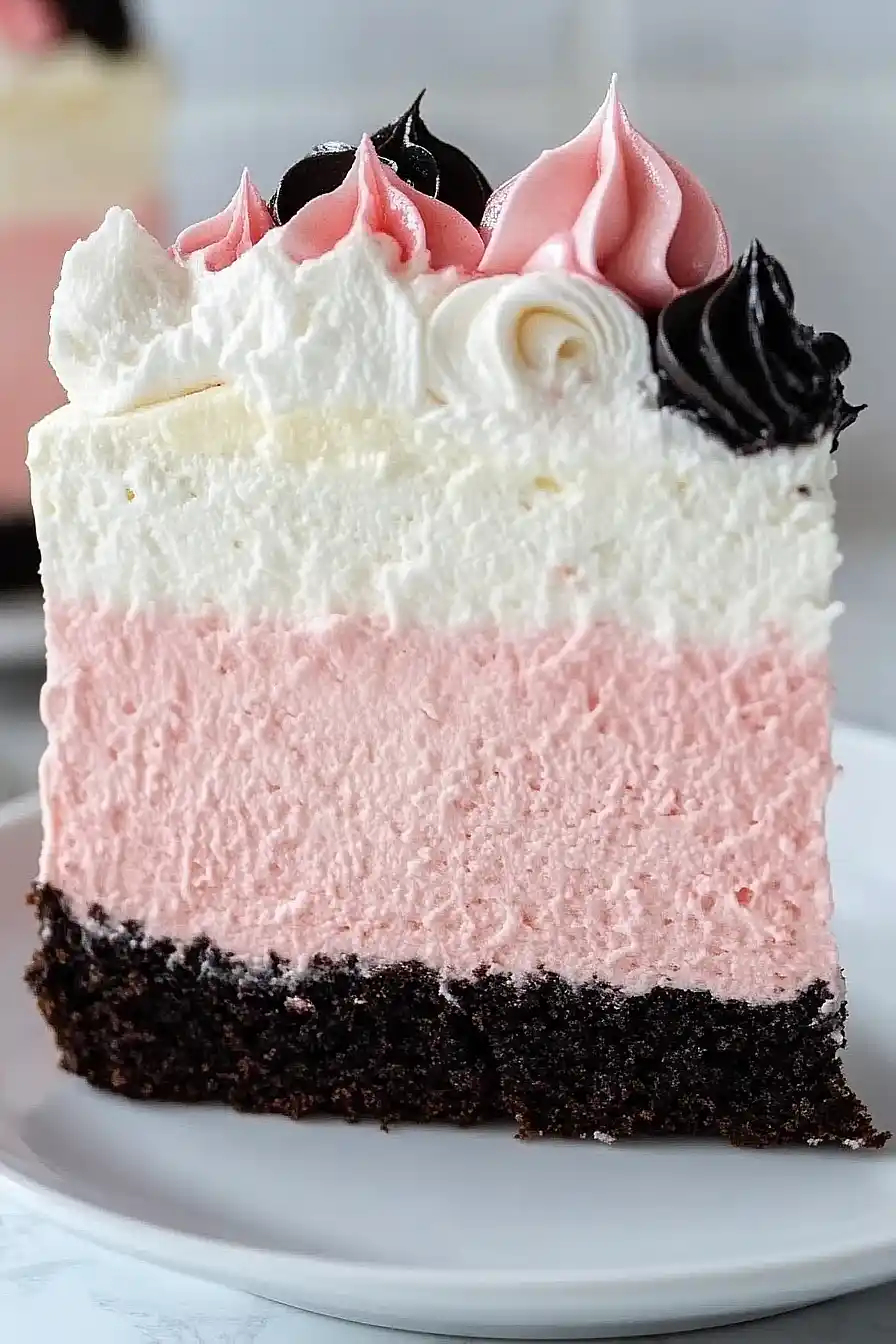
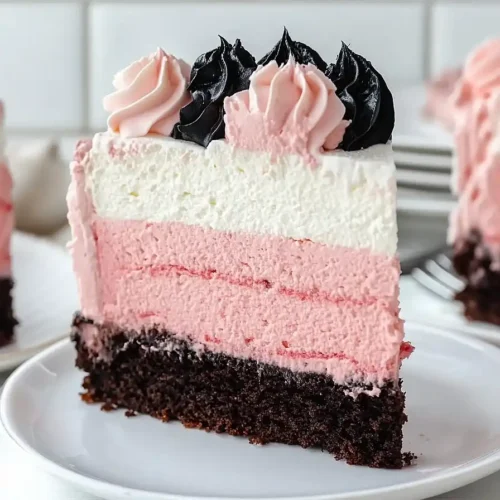
This Neapolitan-inspired treat brings together three classic flavors in one show-stopping cake that’s perfect for special occasions. Rich chocolate, creamy vanilla, and sweet strawberry layers create a dessert that tastes like your favorite ice cream.
Each layer gets topped with silky buttercream and finished with a glossy chocolate ganache drip. Crunchy toffee bits and fresh strawberries help the whole thing come together.
It’s a crowd-pleasing cake that looks fancy but uses simple techniques, making it doable for home bakers who want to impress.

Why You’ll Love This Neapolitan Millionaire Cake
- Three flavors in one dessert – This cake brings together chocolate, vanilla, and strawberry layers in one show-stopping dessert that’s like having three cakes in one.
- Perfect for special occasions – The impressive layers and beautiful presentation make this cake ideal for birthdays, holidays, or any time you want to wow your guests.
- Rich and indulgent – With cream cheese, heavy cream, and multiple layers, this cake delivers the kind of decadent experience that makes celebrations memorable.
- Classic flavor combination – The nostalgic Neapolitan trio of flavors brings back childhood memories while delivering a sophisticated adult dessert experience.
- Make-ahead friendly – You can prepare the components ahead of time and assemble later, making it easier to manage for parties or special events.
What Kind of Cream Cheese Should I Use?
For this neapolitan millionaire cake, you’ll want to use full-fat brick-style cream cheese rather than the spreadable kind that comes in a tub. The brick cream cheese has a firmer texture that holds up better in cheesecake layers and won’t make your cake too soft or runny. Make sure to bring your cream cheese to room temperature before mixing – this usually takes about an hour on the counter, but you can speed it up by cutting it into smaller chunks. If your cream cheese is too cold, you’ll end up with lumps in your cheesecake layer, and nobody wants that in such a fancy dessert.
Options for Substitutions
This fancy layered cake has room for some swaps if you need to make adjustments:
- Hershey’s Special Dark Cocoa powder: Regular unsweetened cocoa powder works perfectly fine here. You can also use Dutch-processed cocoa for a richer flavor, but don’t skip the cocoa entirely as it’s what gives the chocolate layer its signature taste.
- Buttermilk: No buttermilk? Make your own by adding 1 tablespoon of lemon juice or white vinegar to regular milk and let it sit for 5 minutes before using.
- Strawberry extract: If you can’t find strawberry extract, you can use 1 tablespoon of strawberry jam (strained) or 2 teaspoons of vanilla extract plus some fresh strawberry puree for flavor.
- Vanilla bean paste: Regular vanilla extract works just fine – use the same amount. The paste just gives you those pretty vanilla bean specks, but the flavor will be the same.
- Sour cream: Greek yogurt makes a great substitute here and will give you the same tangy richness in the cheesecake layer.
- Red food coloring: You can skip this entirely for a more natural look, or use beet juice powder for a natural pink tint. The cake will still taste great without the bright color.
Watch Out for These Mistakes While Baking
The biggest mistake with this layered cake is not allowing each component to cool completely before assembly, which can cause the layers to melt into each other and ruin the distinct Neapolitan look you’re going for. When making the chocolate cake layer, be careful not to overmix once you add the boiling water – this liquid helps create a moist cake, but too much stirring can make it tough. For the strawberry cheesecake layer, make sure your cream cheese is truly at room temperature before mixing to avoid lumps, and don’t skip the water bath when baking as it prevents cracks from forming. The vanilla mousse layer requires properly bloomed gelatin, so let it sit in cold water for the full time before dissolving – rushed gelatin won’t set properly and your mousse will be runny. Finally, chill each layer for at least 2 hours between assembly steps, and use a sharp knife dipped in warm water when slicing to get clean, professional-looking cuts.
What to Serve With Neapolitan Millionaire Cake?
This rich, layered cake is honestly a showstopper all on its own, but a few simple additions can make it even more special. I love serving it with fresh strawberries and a handful of raspberries on the side – the tartness of the berries cuts through all that creamy sweetness perfectly. A scoop of vanilla ice cream never hurts either, especially if you’re serving this at a party where people might want an extra indulgent treat. For drinks, consider pairing it with coffee, milk, or even a glass of dessert wine if you’re feeling fancy.
Storage Instructions
Refrigerate: This gorgeous layered cake needs to stay chilled in the fridge covered with plastic wrap or in a cake carrier for up to 5 days. The cream layers and cheesecake components really need that cool temperature to maintain their texture and prevent spoilage.
Make Ahead: You can actually make this cake a day or two ahead of time, which is great for special occasions! The flavors meld together beautifully overnight, and it gives you more time to focus on other party prep. Just keep it covered and chilled until you’re ready to serve.
Freeze: Individual slices freeze really well wrapped tightly in plastic wrap and stored in freezer bags for up to 2 months. Let them thaw in the fridge for a few hours before serving. The whole cake can be frozen too, but it’s easier to work with in slices.
| Preparation Time | 45-60 minutes |
| Cooking Time | 110-130 minutes |
| Total Time | 195-240 minutes |
| Level of Difficulty | Medium |
Estimated Nutrition
Estimated nutrition for the whole recipe (without optional ingredients):
- Calories: 7200-8200
- Protein: 85-105 g
- Fat: 480-530 g
- Carbohydrates: 690-760 g
Ingredients
For the chocolate cake layer:
- 1 cup all-purpose flour
- 1 cup granulated sugar
- 1/4 cup plus 1/8 cup hershey’s special dark cocoa powder
- 1 tsp baking soda
- 1/2 tsp salt
- 1 large egg
- 1/2 cup buttermilk
- 1/2 cup vegetable oil
- 3/4 tsp vanilla extract
- 1/2 cup boiling water
For the strawberry cheesecake layer:
- 24 oz cream cheese
- 1 cup granulated sugar
- 3 tbsp all-purpose flour
- 1 cup sour cream
- 4 large eggs
- 3 tbsp strawberry extract
- About 20 drops red food coloring
For the vanilla bean mousse:
- 1 1/2 tsp powdered gelatin
- 1 1/2 tbsp water
- 2 cups heavy cream
- 1/2 cup granulated sugar
- 2 tsp vanilla bean paste
- 1/3 cup heavy cream (additional)
For the whipped icing:
- 2 cups heavy whipping cream
- 1 cup powdered sugar
- 1 tsp vanilla bean paste
- 1/4 tsp vanilla extract
Step 1: Make the Chocolate Cake Layer
- 1 cup all-purpose flour
- 1 cup granulated sugar
- 1/4 cup plus 1/8 cup Hershey’s Special Dark cocoa powder
- 1 tsp baking soda
- 1/2 tsp salt
- 1 large egg
- 1/2 cup buttermilk
- 1/2 cup vegetable oil
- 3/4 tsp vanilla extract
- 1/2 cup boiling water
Preheat your oven to 300°F.
In a large bowl, whisk together 1 cup all-purpose flour, 1 cup granulated sugar, 1/4 cup plus 1/8 cup Hershey’s Special Dark cocoa powder, 1 tsp baking soda, and 1/2 tsp salt.
Add in 1 large egg, 1/2 cup buttermilk, and 1/2 cup vegetable oil, then mix until smooth.
Combine 3/4 tsp vanilla extract with 1/2 cup boiling water, and gradually add to the batter, mixing until fully incorporated and smooth.
Pour the batter into a prepared 9-inch cake pan and bake for 35–38 minutes.
Let the cake cool in the pan for 5–10 minutes, then turn it out onto a cooling rack to finish cooling completely.
Once cooled, slice off the domed top with a long serrated knife for an even layer.
Step 2: Prepare the Strawberry Cheesecake Layer
- 24 oz cream cheese
- 1 cup granulated sugar
- 3 tbsp all-purpose flour
- 1 cup sour cream
- 4 large eggs
- 3 tbsp strawberry extract
- about 20 drops red food coloring
Preheat oven to 300°F.
Line the bottom of a 9-inch springform pan with parchment and grease the sides.
Using low speed, blend 24 oz cream cheese, 1 cup granulated sugar, and 3 tbsp all-purpose flour until smooth.
Add 1 cup sour cream and 2 eggs and beat just until combined.
Add the remaining 2 eggs, 3 tbsp strawberry extract, and about 20 drops red food coloring, mixing until smooth.
Pour the batter into the pan, tap gently on the counter to release air bubbles, and wrap the bottom of the pan in foil for a water bath.
Place the pan in a larger dish and pour warm water halfway up the springform pan sides.
Bake for 1 hour 35 minutes, then turn off the oven and leave the cake inside with the door closed for 20 minutes.
Crack the oven door and cool for another 10 minutes.
Refrigerate at least 5–6 hours until firm.
Once set, remove cheesecake from the pan.
I like to add the food coloring in small increments until the pink is just right for a festive look.
Step 3: Make the Vanilla Bean Mousse
- 1 1/2 tsp powdered gelatin
- 1 1/2 tbsp water
- 2 cups heavy cream
- 1/2 cup granulated sugar
- 2 tsp vanilla bean paste
- 1/3 cup heavy cream (additional)
In a small bowl, sprinkle 1 1/2 tsp powdered gelatin over 1 1/2 tbsp water and let bloom for 5 minutes.
Meanwhile, place your mixer bowl and whisk attachment in the freezer for about 10 minutes.
Whip 2 cups heavy cream at high speed until it begins to thicken, then add 1/2 cup granulated sugar and 2 tsp vanilla bean paste, continuing to whip until stiff peaks form.
Warm an additional 1/3 cup heavy cream in the microwave (about 30 seconds), then stir in the gelatin until dissolved.
Allow to cool slightly, then gently fold the gelatin mixture into the whipped cream and whip again if needed to reach stiff peaks.
Step 4: Assemble Cheesecake and Mousse Layers
- cheesecake from Step 2
- vanilla bean mousse from Step 3
Prepare the springform pan again by placing parchment on the bottom and around the sides, leaving some parchment sticking up above the top edge.
Place the set strawberry cheesecake (from Step 2) gently into the pan.
Pour the vanilla bean mousse (from Step 3) evenly over the cheesecake and smooth the top.
Refrigerate for about 2 1/2 hours until the mousse is fully set.
Step 5: Make the Whipped Icing
- 2 cups heavy whipping cream
- 1 cup powdered sugar
- 1 tsp vanilla bean paste
- 1/4 tsp vanilla extract
Chill your mixing bowl and whisk attachment in the freezer for about 10 minutes.
Whip 2 cups heavy whipping cream on high speed until it starts to hold soft peaks.
Add 1 cup powdered sugar, 1 tsp vanilla bean paste, and 1/4 tsp vanilla extract.
Continue whipping on high until thick and creamy.
I always recommend chilling the bowl and whisk to help the cream whip up faster and stay light and fluffy.
Step 6: Layer and Decorate the Cake
- chocolate cake from Step 1
- cheesecake and mousse layers from Step 4
- whipped icing from Step 5
- cocoa powder (for tinting, from ‘1/4 cup plus 1/8 cup Hershey’s Special Dark cocoa powder’)
- red food coloring (for tinting, from ‘about 20 drops red food coloring’)
Remove the cheesecake and mousse layers from the fridge.
Set the chocolate cake layer (from Step 1) on a cake board or serving plate.
Carefully remove the cheesecake/mousse from the springform pan and place it on top of the chocolate cake, ensuring the cheesecake layer is in the middle and the mousse is on top.
Spread a thin layer of whipped icing (from Step 5) over the cake layer; you can mix in a little cocoa powder to tint it if you want the layer between cake and cheesecake to be less visible.
Ice the whole assembled cake with the remaining whipped icing.
Divide the leftover icing into three bowls: tint one with cocoa for brown, one with a few drops of red food coloring for pink, and leave one white.
Pipe all three colors in a decorative pattern on top.
Refrigerate the cake until ready to serve.
Homemade Neapolitan Millionaire Cake
Ingredients
For the chocolate cake layer:
- 1 cup all-purpose flour
- 1 cup granulated sugar
- 1/4 cup plus 1/8 cup Hershey’s Special Dark cocoa powder
- 1 tsp baking soda
- 1/2 tsp salt
- 1 large egg
- 1/2 cup buttermilk
- 1/2 cup vegetable oil
- 3/4 tsp vanilla extract
- 1/2 cup boiling water
For the strawberry cheesecake layer:
- 24 oz cream cheese
- 1 cup granulated sugar
- 3 tbsp all-purpose flour
- 1 cup sour cream
- 4 large eggs
- 3 tbsp strawberry extract
- about 20 drops red food coloring
For the vanilla bean mousse:
- 1 1/2 tsp powdered gelatin
- 1 1/2 tbsp water
- 2 cups heavy cream
- 1/2 cup granulated sugar
- 2 tsp vanilla bean paste
- 1/3 cup heavy cream (additional)
For the whipped icing:
- 2 cups heavy whipping cream
- 1 cup powdered sugar
- 1 tsp vanilla bean paste
- 1/4 tsp vanilla extract
Instructions
- Preheat your oven to 300°F. In a large bowl, whisk together 1 cup all-purpose flour, 1 cup granulated sugar, 1/4 cup plus 1/8 cup Hershey’s Special Dark cocoa powder, 1 tsp baking soda, and 1/2 tsp salt. Add in 1 large egg, 1/2 cup buttermilk, and 1/2 cup vegetable oil, then mix until smooth. Combine 3/4 tsp vanilla extract with 1/2 cup boiling water, and gradually add to the batter, mixing until fully incorporated and smooth. Pour the batter into a prepared 9-inch cake pan and bake for 35–38 minutes. Let the cake cool in the pan for 5–10 minutes, then turn it out onto a cooling rack to finish cooling completely. Once cooled, slice off the domed top with a long serrated knife for an even layer.
- Preheat oven to 300°F. Line the bottom of a 9-inch springform pan with parchment and grease the sides. Using low speed, blend 24 oz cream cheese, 1 cup granulated sugar, and 3 tbsp all-purpose flour until smooth. Add 1 cup sour cream and 2 eggs and beat just until combined. Add the remaining 2 eggs, 3 tbsp strawberry extract, and about 20 drops red food coloring, mixing until smooth. Pour the batter into the pan, tap gently on the counter to release air bubbles, and wrap the bottom of the pan in foil for a water bath. Place the pan in a larger dish and pour warm water halfway up the springform pan sides. Bake for 1 hour 35 minutes, then turn off the oven and leave the cake inside with the door closed for 20 minutes. Crack the oven door and cool for another 10 minutes. Refrigerate at least 5–6 hours until firm. Once set, remove cheesecake from the pan. I like to add the food coloring in small increments until the pink is just right for a festive look.
- In a small bowl, sprinkle 1 1/2 tsp powdered gelatin over 1 1/2 tbsp water and let bloom for 5 minutes. Meanwhile, place your mixer bowl and whisk attachment in the freezer for about 10 minutes. Whip 2 cups heavy cream at high speed until it begins to thicken, then add 1/2 cup granulated sugar and 2 tsp vanilla bean paste, continuing to whip until stiff peaks form. Warm an additional 1/3 cup heavy cream in the microwave (about 30 seconds), then stir in the gelatin until dissolved. Allow to cool slightly, then gently fold the gelatin mixture into the whipped cream and whip again if needed to reach stiff peaks.
- Prepare the springform pan again by placing parchment on the bottom and around the sides, leaving some parchment sticking up above the top edge. Place the set strawberry cheesecake (from Step 2) gently into the pan. Pour the vanilla bean mousse (from Step 3) evenly over the cheesecake and smooth the top. Refrigerate for about 2 1/2 hours until the mousse is fully set.
- Chill your mixing bowl and whisk attachment in the freezer for about 10 minutes. Whip 2 cups heavy whipping cream on high speed until it starts to hold soft peaks. Add 1 cup powdered sugar, 1 tsp vanilla bean paste, and 1/4 tsp vanilla extract. Continue whipping on high until thick and creamy. I always recommend chilling the bowl and whisk to help the cream whip up faster and stay light and fluffy.
- Remove the cheesecake and mousse layers from the fridge. Set the chocolate cake layer (from Step 1) on a cake board or serving plate. Carefully remove the cheesecake/mousse from the springform pan and place it on top of the chocolate cake, ensuring the cheesecake layer is in the middle and the mousse is on top. Spread a thin layer of whipped icing (from Step 5) over the cake layer; you can mix in a little cocoa powder to tint it if you want the layer between cake and cheesecake to be less visible. Ice the whole assembled cake with the remaining whipped icing. Divide the leftover icing into three bowls: tint one with cocoa for brown, one with a few drops of red food coloring for pink, and leave one white. Pipe all three colors in a decorative pattern on top. Refrigerate the cake until ready to serve.